
Playwrightには、Cookieなどのセッション情報を、テストを跨いで利用可能とする方法があります。
SNSにログインすると、次にアクセスする時はログインが不要になるのと同じことができます。
この方法を使えば、テストの度ログインする手間が省けます、
公式ドキュメントのdocs/Authenticationにはその方法がまとめられています。
しかし、どのような場合に、どの方法を使えばいいのかわからなかったため
フロー図で整理しました。
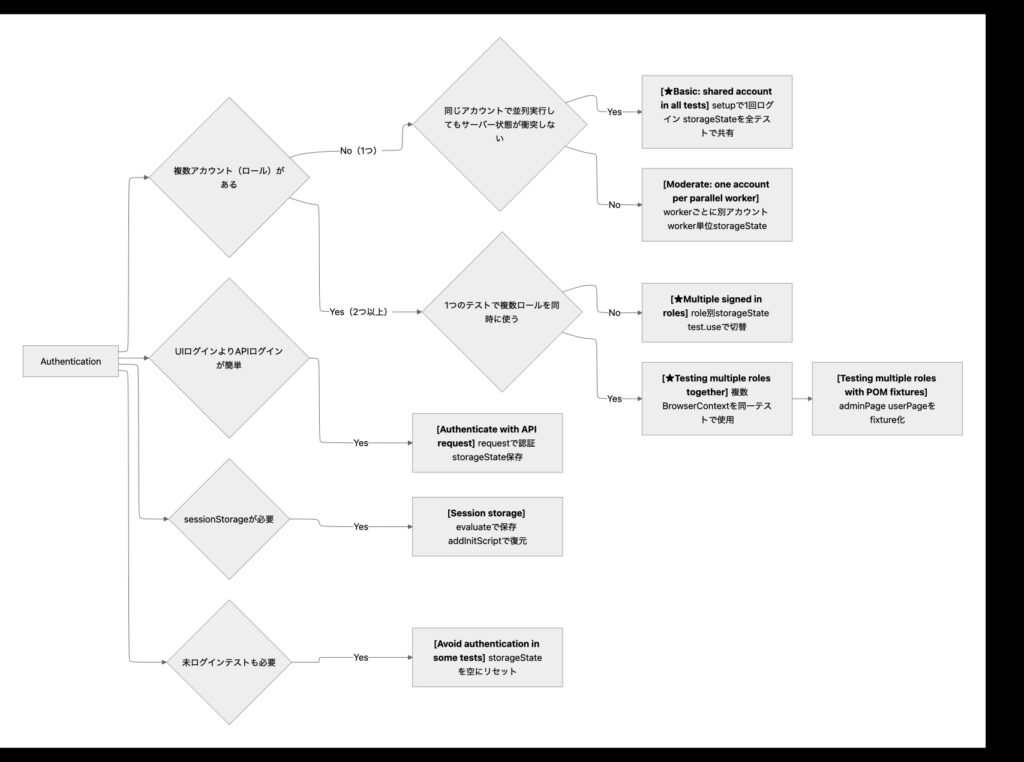
この記事ではフロー図内で★を付けた3つについてまとめました。
- Basic: shared account in all tests
- Multiple signed in roles
- Testing multiple roles together
1. Basic: shared account in all tests
- 全てのテストを同じユーザー(ロール)でログインして実行したい場合に使用します
まずはplaywright配下に.authフォルダを作成します。
mkdir -p playwright/.auth

playwright
  └─ .auth
次に、tests配下にauth.setup.tsを作成し、auth.setup.tsにテストを書き実行します。
// tests/auth.setup.ts

import { test as setup, expect } from '@playwright/test';
import path from 'path';

const authFile = path.join(__dirname, '../playwright/.auth/user.json');

setup('authenticate', async ({ page }) => {
  // Perform authentication steps. Replace these actions with your own.
  await page.goto('https://github.com/login');
  await page.getByLabel('Username or email address').fill('username');
  await page.getByLabel('Password').fill('password');
  await page.getByRole('button', { name: 'Sign in' }).click();
  // Wait until the page receives the cookies.
  //
  // Sometimes login flow sets cookies in the process of several redirects.
  // Wait for the final URL to ensure that the cookies are actually set.
  await page.waitForURL('https://github.com/');
  // Alternatively, you can wait until the page reaches a state where all cookies are set.
  await expect(page.getByRole('button', { name: 'View profile and more' })).toBeVisible();

  // End of authentication steps.

  await page.context().storageState({ path: authFile });
});
こちらはGithubのログイン例なので、自身のプロダクトのURL等に変更してください。
重要なのはこのコード
await page.context().storageState({ path: authFile });
});
このコードでログイン状態をファイルに保存します。
authFile = path.join(__dirname, ‘../playwright/.auth/user.json’);であるため
setup.tsを実行すると.auth配下にuser.jsonが作成されます。
次にPlaywrightの設定を変更します。
playwright.config.tsのprojects:に”storageState: ‘playwright/.auth/user.json’,”を追記します。
// playwright.config.ts

import { defineConfig, devices } from '@playwright/test';

export default defineConfig({
  projects: [
    // Setup project
    { name: 'setup', testMatch: /.*\.setup\.ts/ },

    {
      name: 'chromium',
      use: {
        ...devices['Desktop Chrome'],
        // Use prepared auth state.
        storageState: 'playwright/.auth/user.json',
      },
      dependencies: ['setup'],
    },

    {
      name: 'firefox',
      use: {
        ...devices['Desktop Firefox'],
        // Use prepared auth state.
        storageState: 'playwright/.auth/user.json',
      },
      dependencies: ['setup'],
    },
  ],
});
Playwrightの設定にログイン状態を保存したファイルを指定することで、
テストケースに手を加えなくても、同じログイン状態からテスト実行可能になります。
ログイン処理をテストケース毎に記述する必要もなくなります。
2. Multiple signed in roles
- テスト毎にアカウント(ロール)を切り替えたい
例えば、管理者ユーザーでは登録、更新、削除操作のテストがしたい。
一般ユーザーでは、登録のみできることをテストしたい、みたいな場合です。
// tests/auth.setup.ts

import { test as setup, expect } from '@playwright/test';

const adminFile = 'playwright/.auth/admin.json';

setup('authenticate as admin', async ({ page }) => {
  // Perform authentication steps. Replace these actions with your own.
  await page.goto('https://github.com/login');
  await page.getByLabel('Username or email address').fill('admin');
  await page.getByLabel('Password').fill('password');
  await page.getByRole('button', { name: 'Sign in' }).click();
  // Wait until the page receives the cookies.
  //
  // Sometimes login flow sets cookies in the process of several redirects.
  // Wait for the final URL to ensure that the cookies are actually set.
  await page.waitForURL('https://github.com/');
  // Alternatively, you can wait until the page reaches a state where all cookies are set.
  await expect(page.getByRole('button', { name: 'View profile and more' })).toBeVisible();

  // End of authentication steps.

  await page.context().storageState({ path: adminFile });
});

const userFile = 'playwright/.auth/user.json';

setup('authenticate as user', async ({ page }) => {
  // Perform authentication steps. Replace these actions with your own.
  await page.goto('https://github.com/login');
  await page.getByLabel('Username or email address').fill('user');
  await page.getByLabel('Password').fill('password');
  await page.getByRole('button', { name: 'Sign in' }).click();
  // Wait until the page receives the cookies.
  //
  // Sometimes login flow sets cookies in the process of several redirects.
  // Wait for the final URL to ensure that the cookies are actually set.
  await page.waitForURL('https://github.com/');
  // Alternatively, you can wait until the page reaches a state where all cookies are set.
  await expect(page.getByRole('button', { name: 'View profile and more' })).toBeVisible();

  // End of authentication steps.

  await page.context().storageState({ path: userFile });
});
1つ目のセットアップがadmin用。
adminのアカウントでログインし、認証情報をadmin.jsonに保存しています。
2つ目のセットアップが一般ユーザー用。
一般ユーザーのアカウントでログインし、認証情報をuser.jsonに保存しています。
テストの書き方としては、テストの前にuse()を指定します。
// tests/example.spec.ts

import { test } from '@playwright/test';

test.use({ storageState: 'playwright/.auth/admin.json' });

test('admin test', async ({ page }) => {
  // page is authenticated as admin
});
use()の中に認証情報{ storageState: ‘playwright/.auth/admin.json’ }指定することで
その認証情報が使われます。
テストはdescribeを使用しグループ化することができます。
// tests/example.spec.ts

import { test } from '@playwright/test';

test.describe(() => {
  test.use({ storageState: 'playwright/.auth/user.json' });

  test('user test', async ({ page }) => {
    // page is authenticated as a user
  });
});
グループの中でuse()を使用した場合、グループ内のテストはuse()で指定した認証情報{ storageState: ‘playwright/.auth/user.json’ }が使われます。
3. Testing multiple roles together
- 1つのテストで複数ロールを同時に使う
例えば、管理者ユーザーでログインし、商品登録した後、
一般ユーザーに切り替えて商品購入する、みたいなテストをしたい場合です。
import { test } from '@playwright/test';

test('admin and user', async ({ browser }) => {
  // adminContext and all pages inside, including adminPage, are signed in as "admin".
  const adminContext = await browser.newContext({ storageState: 'playwright/.auth/admin.json' });
  const adminPage = await adminContext.newPage();

  // userContext and all pages inside, including userPage, are signed in as "user".
  const userContext = await browser.newContext({ storageState: 'playwright/.auth/user.json' });
  const userPage = await userContext.newPage();

  // ... interact with both adminPage and userPage ...

  await adminContext.close();
  await userContext.close();
});
Basic: shared account in all testsとの違いは
- ({ page })が({ browser })になったこと
- ({ browser })になったことでnewContext()が利用可能になり、newPage()が呼べるようになったことなった
コードを見てみると
  // adminContext and all pages inside, including adminPage, are signed in as "admin".
  const adminContext = await browser.newContext({ storageState: 'playwright/.auth/admin.json' });
  const adminPage = await adminContext.newPage();
newContext()でadmin用のContextを作成し、storageState:でadmin用の認証情報を参照しています。
またnewPage();でadmin用のPageを作成しています。
これによりadminPageはadmin用のページとして振る舞うことができます。
  // userContext and all pages inside, including userPage, are signed in as "user".
  const userContext = await browser.newContext({ storageState: 'playwright/.auth/user.json' });
  const userPage = await userContext.newPage();
ここではnewContext()で一般ユーザー用のContextを作成し、storageState:で一般ユーザー用の認証情報を参照しています。
またnewPage();で一般ユーザー用のPageを作成しています。
これによりuserPageは一般ユーザー用のページとして振る舞うことができます。
このようにすることで、1つのテストで複数のロールを同時に使うことができます。
テストは”// … interact with both adminPage and userPage …”の部分に書きます。
admin用のページ、一般ユーザー用のページそれぞれに対してテストを書きます。
例えばadmin用のページと一般ユーザー用のページで
特定のページを表示したい場合はこのように書きます。
await adminPage.goto('https://XXX');
await userPage.goto('https://XXX');
最後にブラウザを閉じたい場合は、それぞれのContextをcloseして終了です。
({ page })を使用する場合はテスト終了後自動でページを閉じますが
({ browser })を使用しPageを作成する場合は自動で閉じません。
閉じたい場合はコードの記載が必要です。
まとめ
公式ドキュメントに沿って3つの方法をまとめました。
- Basic: shared account in all tests
- 全てのテストを同じユーザー(ロール)でログインして実行したい場合
- Multiple signed in roles
- テスト毎にユーザー(ロール)を切り替えたい場合
- Testing multiple roles together
- 1つのテストで複数のユーザー(ロール)を同時に使う
行いたいテストにに合わせて使い分けてみてください。